
A review in Qrtr is not a read-through with an email at the end. It is a structured pass over a document in which every observation you make becomes a tracked issue with a type, a severity and a place in the text — and those issues appear in the author's Fix Queue as you create them, including inside Word while they are still working. This guide covers what you do from the moment you are asked to review through to handing the document on.
Finding the review you have been asked to do
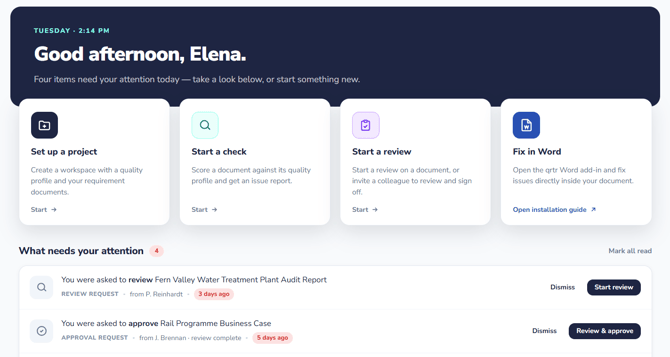
When an author sends you a document you get an email and an in-app notification, and the request appears on your home page under What needs your attention as "You were asked to review [document]", with the age of the request and a Start review button beside it. There is also a Dismiss option, which clears the item from your list rather than declining the review, so use it with care.
You can also work from the Reviews section in the left navigation, which lists every review in the organisation. The filter panel there groups them by reviewer, by approver and by project, so filtering to your own name is the quickest way to see your workload.
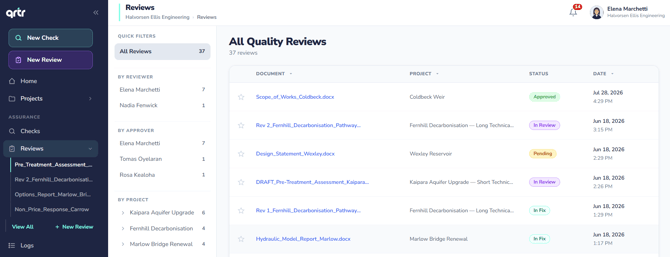
The Reviews list with the left filter panel visible so By Reviewer, By Approver and By Project are all legible, and the Status column showing a mix of In Review, In Fix, Pending and Approved. Use a view where document names are demo content.
What you are looking at
Opening a review gives you three panels.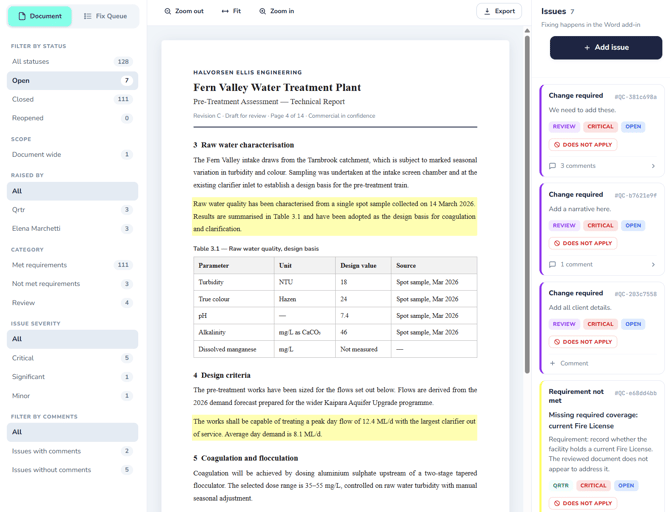
The narrow left panel filters the issue list. Filter by status splits issues into Open and Closed; Scope separates document-wide issues from anchored ones; Raised by lets you see only your own or only Qrtr's findings; and Category distinguishes Requirements — the findings Qrtr generated from the project's requirement documents — from Review, which are the ones people have raised.
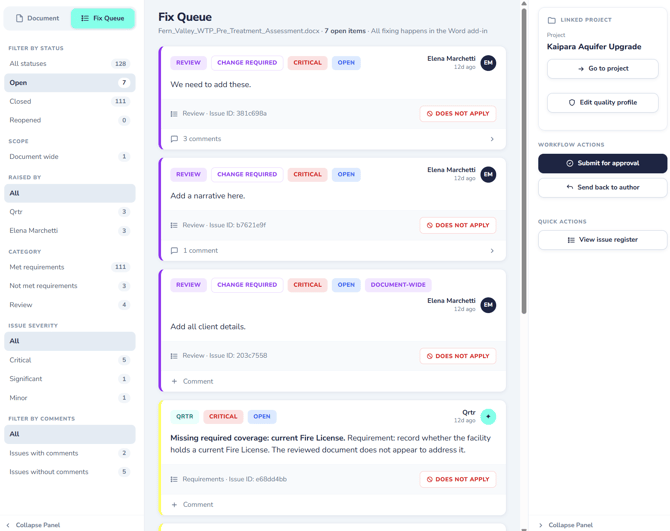
The middle panel toggles between Document and Fix Queue. Document renders the file itself with Zoom Out, Fit, Zoom In and Export controls, and is where you read and highlight. Fix Queue shows the same issues as a working list with the linked project and workflow actions alongside.
The right panel in Document view is the issues list, headed with the issue count and the note that fixing happens in the Word add-in — a useful reminder that your job here is to raise and discuss, not to edit the text.
Reading Qrtr's findings before adding your own
Start with what Qrtr has already found and that has not been resolved by the author, because it changes what is worth your attention. Each machine-generated issue is labelled Requirement Not Met or Requirement Met, carries a severity of Critical, Significant or Minor, and has an issue ID. Where Qrtr could tie the finding to a specific passage it shows Anchored to with that text; where it could not, you see a Missing flag and the note that the requirement could not be located in the document.
Show requirement expands to list the underlying requirements the finding came from, each opening the source so you can check the wording yourself rather than taking the summary on trust. On a contested finding this is the first thing to do.
Raising an issue

Select + Add Issue to open Create Review Issue. The scope is set by what you do before you open it: highlight text in the document first and the issue is anchored to that passage; leave nothing highlighted and it is raised against the whole document, which the panel shows as Document-wide issue.
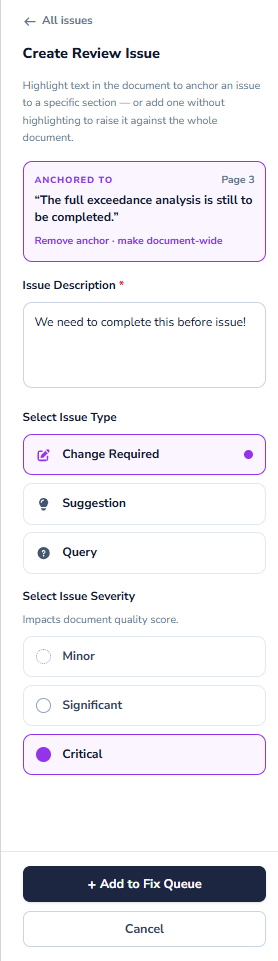
Then you make three decisions. Issue Description is required and is what the author will actually read, so be specific about what needs to change rather than describing your reaction to it. Issue Type is Change Required, Suggestion or Query — the distinction matters more than it looks, because it tells the author whether they must act, may act, or simply need to answer you. Issue Severity is Minor, Significant or Critical, and the panel notes that severity affects the document quality score, so it is not a mood setting.
+ Add to Fix Queue files the issue. It appears in the author's queue immediately, in the browser and in the add-in.
Talking to the author
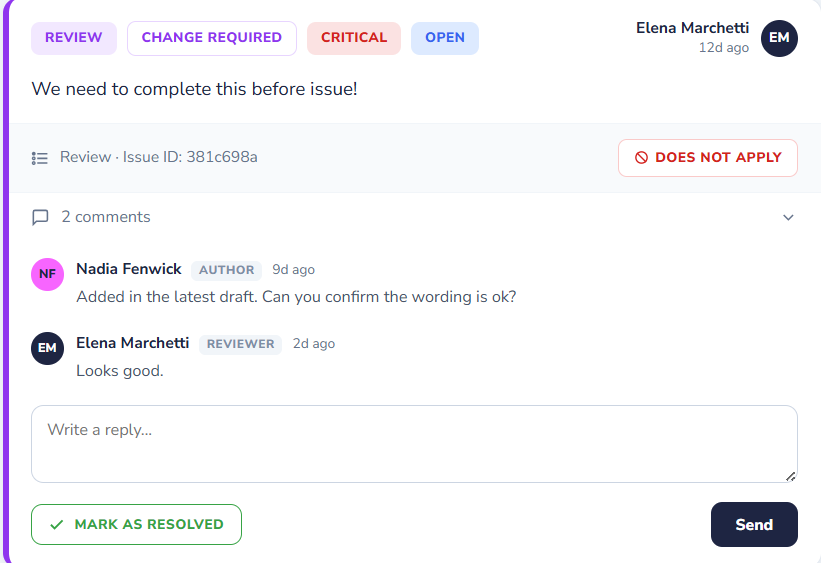
Every issue carries a comment thread. Open + Comment on any issue and you get the conversation to date — author avatar, name, date, text — and a reply box. Comments are the right place for reasoning, context and back-and-forth; they are also permanently logged against the issue, which is why they are worth writing carefully.
You can also mark an issue Does not apply if you conclude a finding is not relevant to this document. If the reason is not obvious from the finding itself, leave a comment saying why.
Handing the document on
When you are done, switch to Fix Queue and use the workflow actions in the right panel. From In Review, the actions available are Submit for Approval, which passes the document to the approval stage and Send back to Author, which pases the document back to the In Fix stage. The panel also gives you Go to Project and Edit Quality Profile if your review has surfaced a problem with the standard rather than the document — a requirement that is wrong or missing is worth fixing at the project level rather than raising the same issue on every future document.