
What this screen is for
When you add a requirements document to a project, Qrtr reads it and extracts every obligation it can find. Those extracted requirements are what your Qrtr Check scores against, and what reviewers see as Requirements issues. The requirements editor is where you check that extraction, switch off anything that shouldn't be scored, and add anything Qrtr missed.
Nothing you do here takes effect immediately. Changes are collected up and applied to the project's quality profile in one batch when you press Publish. That's deliberate — it means you can work through a long list, change your mind, and commit a single clean version rather than a trail of individual edits.
Getting to the editor
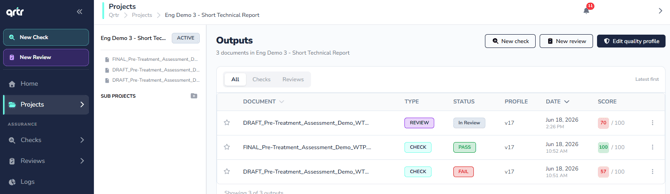
Open Projects from the left navigation, open the project, and click the Edit quality profile.
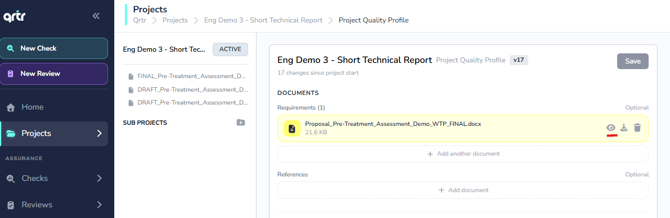
In the Requirements section you'll see the requirement document listed with its file size. Click the eye icon beside the document name.
How the screen is laid out
The editor has three panels.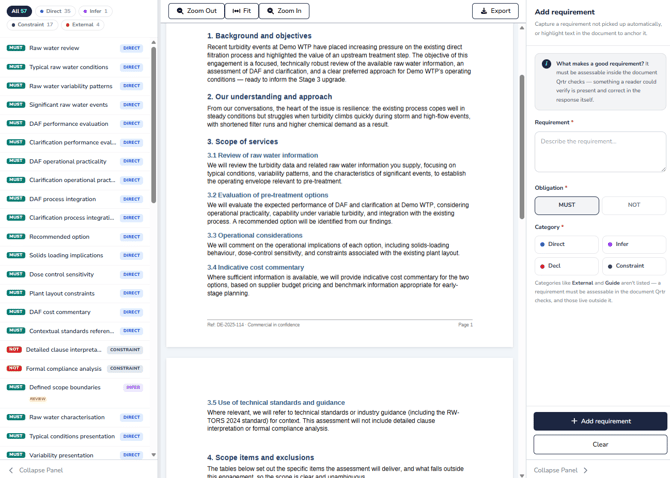
The left panel is the requirement list, with category chips across the top showing counts — for example All, Direct, Decl, Constraint and External. Each row shows an obligation badge, the requirement name, and its category.
The middle panel is the source document itself, with Zoom Out, Fit, Zoom In and Export controls. Passages that requirements were drawn from are marked in the page.
The right panel is Add requirement, and it's also where your unpublished changes and any status messages appear.
Above all three, the breadcrumb shows the file name with the last change and who made it, plus a chevron that opens the document's version history.
Reading a requirement
Every requirement carries an obligation: MUST (the document has to do this) or NOT (the document must not do this). It also carries a category that tells you what kind of obligation it is — Direct for something stated plainly in the source, Infer for something implied, Decl for a declaration or confirmation you have to make, Constraint for a rule about how the document is put together, and External or Guide for obligations that live outside the document Qrtr checks.
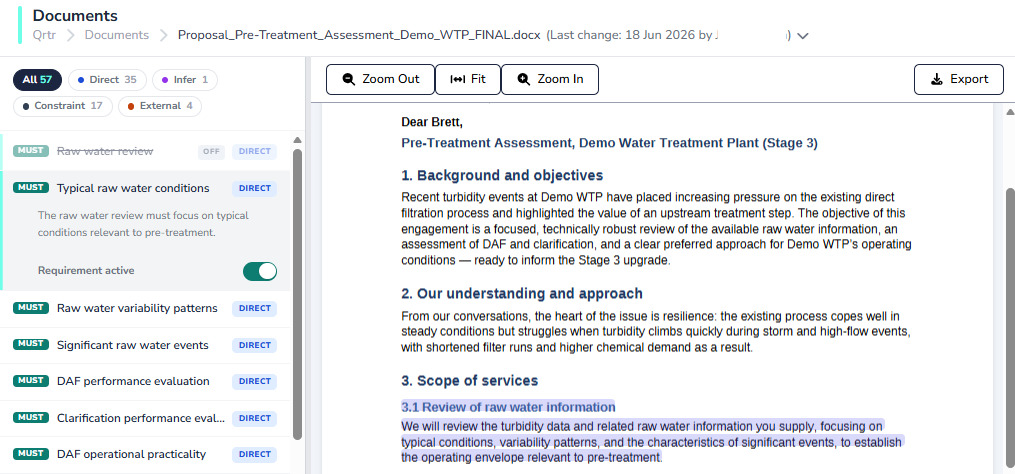
Requirements that have been switched off appear greyed out with an OFF badge, and are ignored when Qrtr scores a document.
Click a requirement row to expand it. You'll see the full requirement text and a Requirement active toggle. At the same time the middle panel scrolls to and highlights the passage in the source document that the requirement came from, which is the quickest way to sanity-check a questionable extraction.
Turning a requirement off, or back on
Use the Requirement active toggle on the expanded row. Switching it off means Qrtr stops scoring against it; switching a previously disabled one back on brings it back into scope.
Turn things off when the extraction has picked up something that isn't genuinely assessable in the deliverable, is duplicated, or belongs to a part of the engagement you aren't producing. Leave everything else on — a requirement that's off contributes nothing to the score, so switching off inconvenient requirements quietly inflates your results.
Adding a requirement Qrtr missed
Use the Add requirement panel on the right.
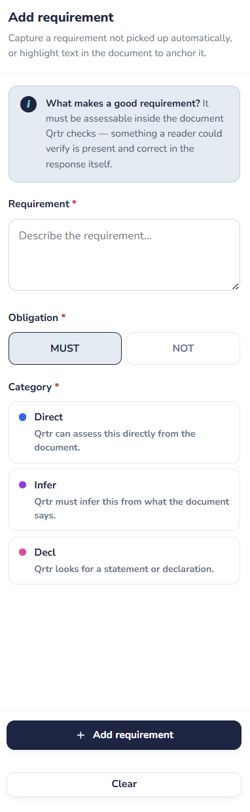
If the requirement relates to a specific passage, highlight that text in the document panel first so the new requirement is anchored to it. If it applies to the response as a whole, just leave the highlight alone.
Type the obligation into Requirement, pick an Obligation of MUST and pick a Category — Direct, Infer, or Decl. Or pick an Obligation of NOT.
Two things worth knowing before you type. First, the guidance in the panel is the real test — if a reader couldn't verify it is present and correct in the response itself, it isn't a good requirement. Second, the requirement's name in the list is taken from the opening of the text you write, so lead with a short, recognisable phrase rather than a long preamble.
Then press + Add requirement. If you leave the text empty you'll be prompted to "Enter the requirement text", and if you skip the category you'll be prompted to "Pick a category". Once accepted, Qrtr confirms "Requirement staged — publish to apply changes" and the new requirement appears at the top of the left-hand list. Clear empties the form without staging anything.
Publishing your changes as a batch
This is the step that makes your edits real.
As soon as you toggle a requirement or stage a new one, a panel appears at the top of the right-hand column headed with the number of changes waiting — for example 3 unpublished changes. Underneath it lists every change individually, each tagged with what it is: NEW for a requirement you added, TURNED OFF for one you disabled, and RE-ENABLED for one you switched back on. Every row has its own Undo link, so you can back out a single change without abandoning the rest.
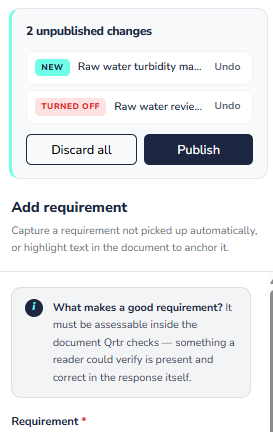
At the bottom of the panel are two buttons. Discard all throws the whole batch away and reloads the requirements as they currently stand, confirming with "Changes discarded". Publish commits the batch.
While the publish is in flight the editor tells you "Publishing changes… editing is paused until the publish finishes." and the list is locked so you can't stack another edit on top of an in-progress save. When it completes you'll see Published changes, the pending panel disappears, and the list you're looking at becomes the new published set. If something goes wrong you'll see Failed to publish changes and your batch is still there to retry.
Publishing changes to a requirements document creates a new an updated version of the project quality profile, with all changes preserved in Logs.
Two safeguards to expect
Qrtr will not let you walk away from an unpublished batch by accident. If you try to close the tab or navigate away with changes still staged, your browser asks "You have unpublished requirement changes. Leave without publishing?" Staged changes only live in the browser session, so if you leave anyway they're gone.
If someone else publishes changes to the same requirements document while you're mid-edit, a red Requirements changed banner appears telling you "Requirements changed while you were editing. Discard your local changes to load the current requirements." with a Discard local changes and load latest button. Publishing is blocked until you do that, which prevents your batch from silently overwriting theirs. On a shared requirements document it's worth agreeing who is doing the pass before you start.
Occasionally you'll open the editor and find you can't change anything. A grey message at the top of the right panel tells you why. You'll see "Requirements are still being generated. You can edit them when processing finishes." while extraction is running, "This document is currently being updated. You can edit requirements when the update finishes." while another process has the document, "Loading requirements snapshot…" briefly on open, and "Restore this version to edit requirements, or return to the current revision." if you're viewing an earlier version rather than the current one. In each case, wait or return to the current revision and the controls come back.
Good practice
Do your requirements pass once, up front, before you run the first check on real work — every check run after a publish scores against the new set, so a mid-engagement change makes earlier reports hard to compare. Work through the whole list and publish one considered batch rather than publishing after each toggle, which keeps the revision history readable.