
What a check report tells you
A Qrtr Check report answers one question: does this document do what it was required to do? It gives you a score, a pass or fail verdict, and an itemised list of every requirement that wasn't met.
This article covers how to read the report, how to work through the issues, and how the approval step controls what you can change and when you can share it.
Opening a report
Reports are reachable from several places: Checks in the left navigation lists everything with filters by project; a project's Outputs table lists that project's checks; and the What needs your attention queue on the Home page surfaces results awaiting your approval, each with a View report button.
The two views: Results and Document
At the top of the second left-hand panel is a toggle between Results and Document. This is the single most useful control on the screen and it's easy to miss.

Results is the analytical view — the score, the summary tiles, and the issue list. Use it to triage and to work through findings systematically.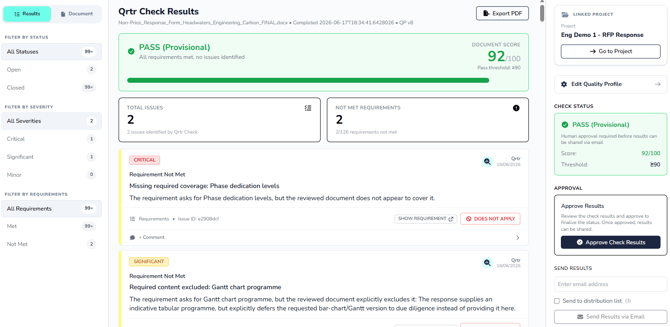
Document renders the actual document with the problem areas highlighted, and the right-hand panel becomes Issue Detail. Click any issue card to navigate to the point in document the issue is linked to. The view has Zoom Out, Fit and Zoom In controls and its own Export button. The left- and right-hand panels can be collapsed to give more room to view the document.
Both views share the same filter panel, so a filter you set in Results carries over to Document.
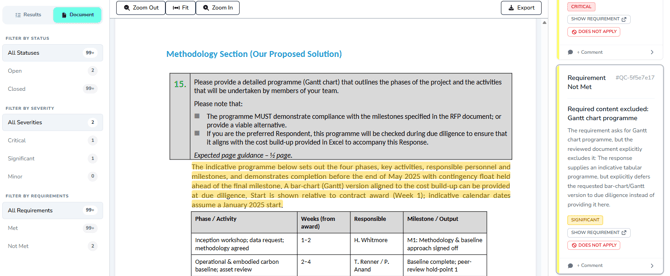
If a requirement is not found in the document i.e. missing from the document, then clicking on the issue card will not go to a location in the document.
The verdict banner
The banner across the top of the Results view gives you the headline. It shows PASS or FAIL, a one-line explanation, the Document score out of 100, and the Pass threshold it was measured against.
If the check requires approval and hasn't had it yet, the verdict is qualified as FAIL (Provisional) or PASS (Provisional). Provisional means the result is real but not yet ratified by a person, and it cannot be shared.
Beneath the banner, the subheading line records the document name, the completion timestamp, and the quality profile version used — shown as something like QP v5. That version reference is how you tie a score back to the exact rules that produced it.
The two summary tiles
Total issues is the count of individual findings Qrtr raised. Not met requirements is expressed as a fraction — for example 18 of 58 requirements not met — which tells you how much of the requirement set the document failed on rather than just how many issues there are.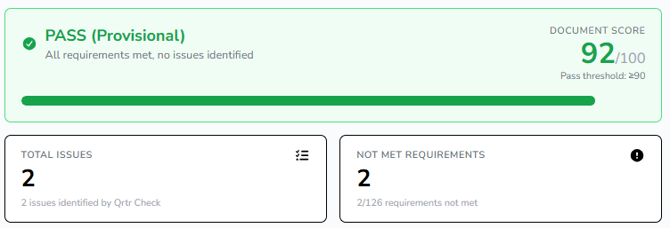
Filtering the issue list
The left panel has three filter groups, and using them is the difference between a five-minute triage and an hour of scrolling.
Filter by status splits issues into Open and Closed, with All statuses as the default. Open issues are the ones still requiring your attention.
Filter by severity offers Critical, Significant and Minor. Start with Critical every time — this is the fastest route to the findings that actually determine whether the document is acceptable.
Filter by requirements switches between All requirements, Met and Not met. Reviewing the Met list is a useful confidence check before you sign anything off, since it shows what the document did get right.
Anatomy of an issue
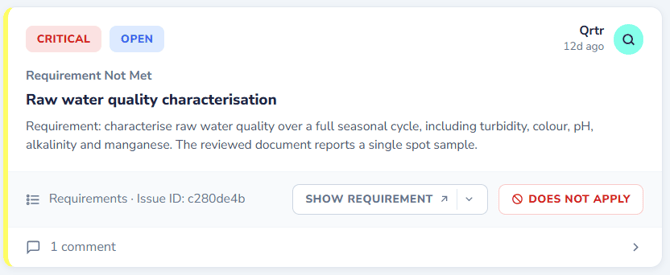
Each issue card carries a severity tag, an issue type such as Requirement Not Met, a short summary of what's missing, and the full requirement text with a note on why the document doesn't satisfy it. A footer line shows the source category and the Issue ID.
In the Document view, issues additionally show an Anchored to field indicating where in the document the finding sits. Where a requirement couldn't be located at all, this reads Missing, which is a meaningful distinction: Qrtr didn't find weak coverage, it found no coverage.
Show requirement opens the underlying requirement in a new tab. Where an issue relates to several requirements, the button gains a dropdown arrow listing each one separately.
Working through issues while the result is provisional
While a result is provisional you have three actions available on each issue, and this window is exactly when to use them.
Does not apply dismisses an open issue as not relevant to this document. Use it for findings that are genuinely out of scope rather than as a way to make a report look better — every dismissal is recorded.
Reopen reverses that, putting a closed issue back into the open list. If you dismissed something in haste, or a colleague disagrees, this is how you undo it.
Comment adds a note to the issue. Click + Comment on any card to expand the thread, type into the reply box and click Send. Comments are how you record why a finding was dismissed, what the fix will be, or who is handling it. This is the field that turns a report into a defensible record.
You can also mark issues as not applying directly from the Document view — often quicker when you're reading the document rather than the list.
The approval step
This is the part most new users get wrong, so it's worth being explicit.
If the project's quality profile requires human approval, everything about the result is provisional until a person approves it. Nothing can be emailed while it stays that way — the report itself states that human approval is required before results can be shared, and the send controls are unavailable.
The Approval panel on the right sits beneath the check status and contains the Approve check results button. Approving finalises the status and unlocks sharing.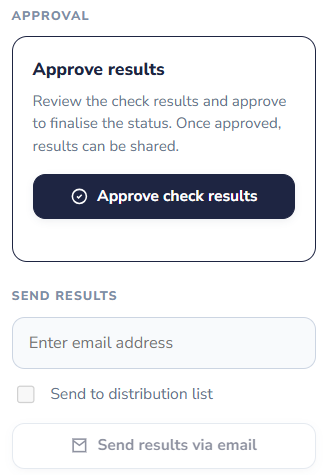
Approval is a one-way gate, and it changes the report in three ways.
First, the provisional qualifier disappears. The verdict becomes a plain PASS or FAIL.
Second, the record is locked. The Does not apply and Reopen buttons disappear from the issue cards, so the status of every finding is fixed as it stood at the moment of approval. Decide your dismissals before you approve, not after.
Third, the approval is attributed. The panel replaces the button with Results approved, naming who approved it and the exact date and time.
Sharing the results
Once approved, the Send results section becomes usable. Enter a single address in the email field, and/or tick Send to distribution list to use the standing recipient list from the project's quality profile — the number of recipients is shown beside the label. Then click Send results via email.
Export PDF at the top right of the report produces the shareable document version. The Document view has its own Export button for the document.
The right-hand panel also shows the Linked project with a Go to project shortcut, and an Edit quality profile link for when a report reveals that your rules, rather than your document, need adjusting.
Fixing the issues
The report tells you what's wrong; it isn't where you fix it. To resolve findings in the document itself, work in the Qrtr Word add-in. To bring a colleague in, use New review to assign a reviewer, gather comments and track the document through to sign-off.
Quick reference
Start with the Critical severity filter rather than reading top to bottom. Use the Document view whenever a finding looks wrong — context usually explains it. Comment on anything you dismiss, so the reasoning survives you. Make all your dismissals before approving, because approval locks them. And remember that nothing can be emailed until it's approved, so a report that seems stuck is usually just waiting on a person.