
A project is the container for everything Qrtr does with your documents. It holds the requirements and reference documents you're working against, the quality profile that defines how strictly documents are scored, and every check and review output produced from it. Getting a project set up properly at the start means every check and review that follows is measured against the right standard.
This guide covers creating a project, adding documents to it, organising it with sub-project folders, and editing or archiving it later.
Where to find your projects
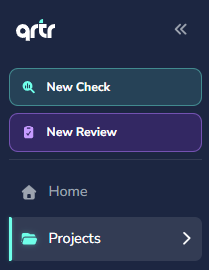
Select Projects in the left navigation. The All Projects view lists every project in your organisation with columns for Project Name, Documents, Status and Last Updated. Each of those column headings can be used to sort the list.
The Quick Filters panel down the left gives you four views: All Projects, Active, Archived and My Projects. Use My Projects when you only want the projects you own, and Archived to find work that has been put away without being deleted.
The star icon at the start of each row adds a project to your favourites. Favourited items appear in a Favourites section at the bottom of the left navigation, grouped under Projects, Quality Checks and Reviews, so the work you return to often is always one click away.
Creating a project
Select + New Project at the top right of the Projects page. The Create new project wizard opens with the subtitle "Set up your quality assessment project" and walks you through three numbered steps: Project details, Add documents and Quality profile.
You can also start this wizard from the Set up a project card on the Home page, or from the Create new project tab inside the Start a check and Start a review wizards if you realise mid-flow that you need a new project.
Step 1 — Project details
Give the project a name in Project Name. This is the only required field, and the hint underneath asks you to choose a descriptive name to easily identify this project. Project names appear in check reports, review lists and the logs, so something specific like a client engagement or deliverable name works far better than a generic label.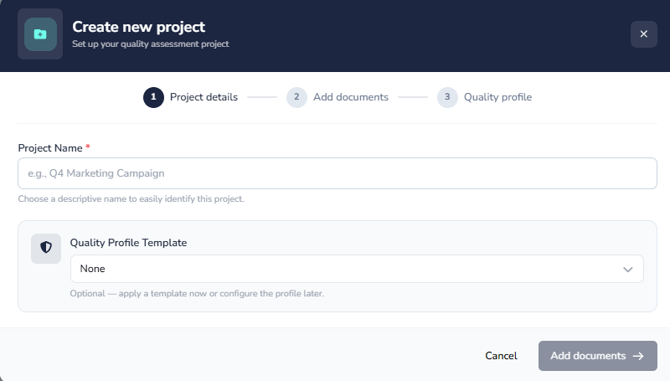
Underneath is an optional Quality Profile Template dropdown, described as optional — apply a template now or configure the profile later. Choosing a template here pre-loads the project's quality profile with a standard set of requirements and workflow settings that your organisation has already built, which saves you configuring the same thing repeatedly. Leave it on None if you'd rather set the profile up by hand.
Select Add documents to continue.
Step 2 — Add documents
This step has two upload zones, and both are marked Optional, so you can skip it entirely and add documents later.
Note that if you have selected a Quality Template Profile these may already be populated.
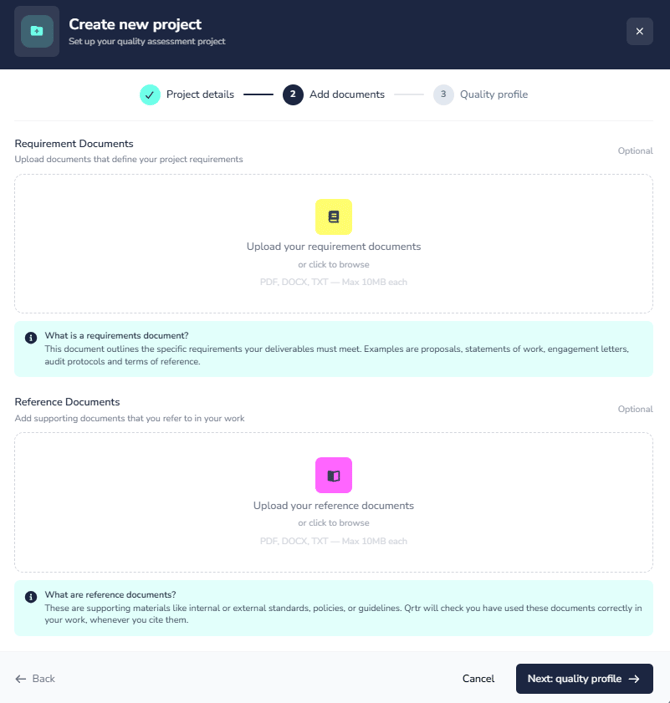
Requirement Documents — upload documents that define your project requirements. The explainer panel beneath describes a requirements document as one that outlines the specific requirements your deliverables must meet, and gives proposals, statements of work, engagement letters, audit protocols and terms of reference as examples. These are the documents Qrtr extracts requirements from and scores your work against, so they are the single most important thing you can add to a project.
Reference Documents — supporting documents that you refer to in your work. The explainer describes these as supporting materials such as internal or external standards, policies or guidelines, and notes that Qrtr will check you have used these documents correctly whenever you cite them.
Step 3 — Quality profile
The final step opens with a line explaining that these become the project's Quality Profile, that defaults are applied, and that you can change anything now or later from the project. Everything here is editable at any point afterwards, so don't feel you have to get it perfect now.
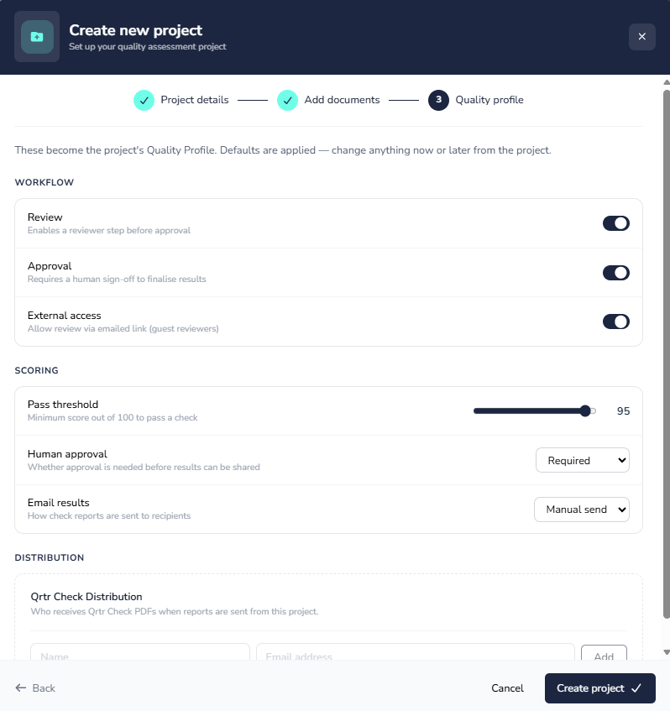
Under Workflow there are three toggles:
Review — enables a reviewer step before approval. Turn this on if documents in this project should go to a human reviewer.
Approval — requires a human sign-off to finalise results. This is the gate that means work is not final until a person signs it off.
External access — allows review via emailed link for guest reviewers. Enable this when you need people outside your organisation to review a document without a Qrtr account.
Under Scoring:
Pass threshold — the minimum score out of 100 to pass a check, set with a slider and defaulting to 95. Any check scoring below this is marked Fail.
Human approval — whether approval is needed before results can be shared, set to Required or Not required. When this is Required, check results stay Provisional and cannot be emailed until someone approves them.
Email results — how check reports are sent to recipients, set to Manual send or Auto send. Manual send means you decide when a report goes out; Auto send releases it automatically once it is eligible.
Under Distribution, the Qrtr Check Distribution list controls who receives Qrtr Check PDFs when reports are sent from this project. Enter a Name and Email address and select Add for each recipient.
What a project looks like once created
Opening a project gives you two panels.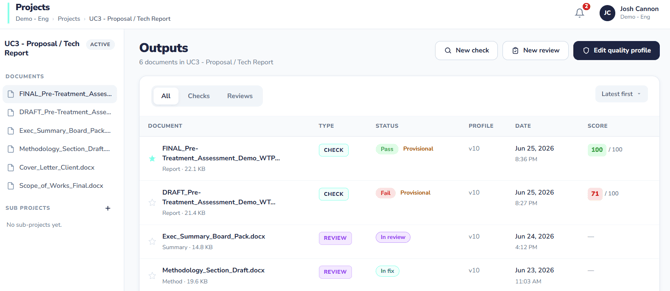
The second left-hand panel shows the project name with a status badge such as Active, a list of the documents held in the project, and a Sub Projects section at the bottom.
The main panel is headed Outputs with a count. This is the full history of everything the project has produced. Tabs let you filter to All, Checks or Reviews, and the list is sorted Latest first by default. The columns are:
- Document — the file name that was checked or reviewed.
- Type — whether the output is a Check or a Review.
- Status — the outcome, for example Fail with a Provisional marker, Pass, or a review status.
- Profile — the version of the project's quality profile that this output was scored against, shown as v1, v2, v7 and so on.
- Date — when it was produced.
- Score — the score out of 100.
- Getting started with Qrtr: your first check from the Home page
- Understanding your quality profile
- How to read your Qrtr Check report
- An introduction to the review workflow
The Profile column is worth paying attention to. Because a quality profile is versioned every time you change it, this column tells you which rules a given result was measured against. If two checks on the same document produced different scores, comparing their profile versions is usually the explanation.
The row menu on each output offers Open, View document and Delete.
Running a check or review from inside a project
The three buttons at the top right of the project are New check, New review and Edit quality profile.
Starting from inside the project is the quickest route, because the project is already filled in for you. Select New check and the Start a check wizard opens on step 1 with the Project field already set to your current project and a note that documents will be scored against this project's quality profile. You go straight to Add document.
Organising work with sub-projects
Large engagements often produce more documents than one flat list can sensibly hold. Sub Projects let you group them.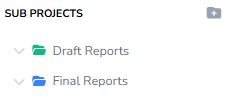
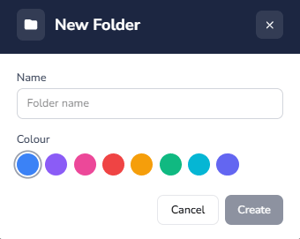
Select the + icon next to the Sub Projects heading in the second left-hand panel. A New Folder dialog opens where you enter a Name and pick a Colour from eight swatches, then select Create.
The colour coding is the useful part — it lets you tell workstreams apart at a glance, for example one colour per deliverable, per phase, or per entity being audited. Agree a colour convention with your team before you start creating folders, so the colours mean the same thing to everyone.
Editing a project
Renaming
You can rename a project from either the Projects list or the project itself. From the list, select the three-dot menu at the end of the row and choose Rename. An Edit Project dialog opens with the current name in the Project Name field. Change it and select Save Changes, or Cancel to back out.
Renaming is safe — it changes the label only, and all existing checks, reviews and outputs stay attached.
Changing documents and settings
Everything else about a project is changed from its quality profile. Select Edit quality profile from the project, which opens the Project Quality Profile page.
Here you can add and remove documents under Documents. Requirements and references are listed separately with a count, and each attached file has three icons: an eye to preview it, a download arrow, and a bin to remove it. + Add another document and + Add document let you attach more.
Below that you can change the same Workflow, Check settings and Distribution options you saw in the wizard. The Save button at the top right stays greyed out until you actually change something.
Two things to keep in mind. First, every saved change creates a new profile version, and the page shows a running count such as "7 changes since project start" alongside the current version badge. Second, changes are not retrospective — existing check results keep the profile version they were scored against. If you want a document assessed against your new settings, run a fresh check.
There's much more detail on what each setting does, and on reading the change history, in the quality profile guide linked below.
Archiving and deleting
Archive puts a project away without destroying anything. Select it from the row menu and the project's status changes to Archived and it drops out of the Active view. Its outputs and history are all preserved. To bring it back, switch to the Archived quick filter, open the row menu, and select Unarchive — which replaces Archive in the menu for archived projects.
Archiving is the right choice for finished engagements. It keeps your active list clean while leaving a complete audit trail.
Delete is different and it is permanent. It appears in red at the bottom of the row menu, and removes the project along with its outputs and history. There is no undo. If there is any chance you'll need the record — and for anything with an assurance or audit purpose there usually is — archive it instead.
A suggested set-up routine
If you're setting up a project for a new engagement, this order tends to work well. Name the project after the engagement or deliverable so it's findable later. Apply a quality profile template if your organisation has one that fits, rather than configuring from scratch. Upload the requirements documents that define what the work must satisfy, and the reference documents containing the standards you'll cite. Set the pass threshold and decide whether human approval is required before results can leave the system. Add your distribution recipients so reports go to the right people without anyone having to remember addresses. Then create sub-project folders for each workstream before documents start accumulating, because retrofitting structure is always more work than starting with it.