
The Admin area is where you control the things that apply across your whole organisation rather than to a single project: the reusable quality profile templates your teams start from, who has an account, and — most importantly — who is allowed to review and approve documents.
Select Admin in the left navigation. The page is a single scrolling view with four sections: Quality Profile Templates, Organisations, Users & Access and Permissions.
Quality Profile Templates
This is the most consequential section for day-to-day quality. A template is a saved set of requirement and reference documents, workflow and scoring settings that anyone can apply when creating a project, which means your standards get applied consistently instead of being reconstructed from memory each time.

The card on the Admin page shows the first five templates with Name, Threshold, Workflow and Created. View all N templates at the foot opens the full Quality Profile Templates page, which is worth using because it shows more: Pass Threshold, Human Approval, Workflow and Created, plus the status badges that the summary card leaves out.
Draft and Published
Every template carries either a Draft or a Published badge.
Draft templates are works in progress. They can be deleted — you'll see a bin icon at the end of the row.
Published templates are in service. They have no bin icon, so they cannot be deleted from the list. That's deliberate: a template that projects have been built from shouldn't be able to vanish.
If you need to retire a published template, the practical route is to leave it in place and stop selecting it for new projects. Check the Most-used Quality Profiles panel on the Insights page first to confirm nothing is actively using it.
Locked and unlocked
Separately from Draft and Published, a template can be locked, shown by a small padlock beside its name.
An unlocked template opens with four buttons — Clone, Lock, Delete and Save — and every field is editable. The name itself is editable inline at the top of the page.
A locked template is read-only. Every field is greyed out and the buttons reduce to just Clone and Unlock. You cannot change the threshold, the toggles or the documents until you unlock it.
Locking is the mechanism for protecting a standard you've agreed and don't want quietly edited. The intended pattern is to build a template, lock it, and have people Clone it when they need a variant — which leaves the approved original intact.
What's inside a template
A template contains the same sections as a project quality profile — Documents (requirements and references), Workflow (Review, Approval, External access), Check settings (Pass threshold, Human approval, Email results) and Distribution. Those are all explained in the quality profile guide.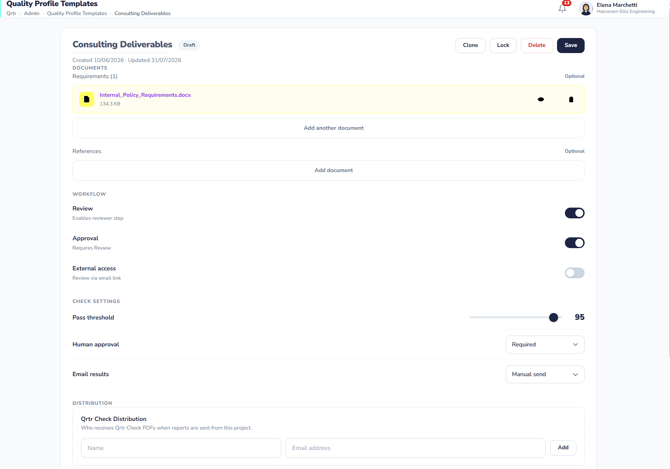
Templates add one section that projects don't have: Sharing.
Sharing a template
The Sharing section has a Visibility setting with three options:
- Private — only your organisation can use this template.
- Shared — visible to specific organisations you choose.
- Public — visible to every organisation on the platform
Below the setting, Shared with lists the organisations that currently have access, and an Add organisation search box lets you find others by name.
Visibility is a genuine access-control decision, not a display preference. Public exposes the template — including its requirement documents, thresholds and distribution settings — to every organisation on the platform. If a template embeds a client's audit protocol or your firm's internal policy, that matters. Treat Private as the default and only widen it deliberately.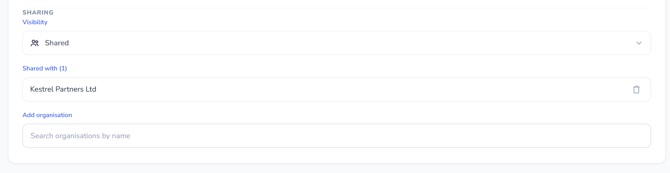
Creating a template
Select + Create Template. A Create Quality Profile Template dialog asks you to set a name for your new template in a Template Name field, then Create. The template opens as a Draft with default settings, ready for you to configure and then lock when you're happy with it.
Users & Access
Subtitled "Manage user accounts, roles, and access status". A count badge shows how many users are Active.
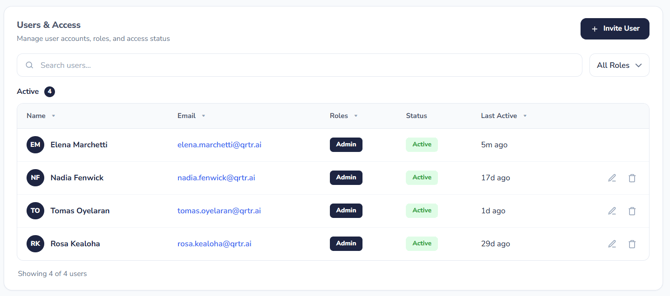
The table lists each user with an avatar and shows Name, Email, Roles, Status and Last Active. A Search users… box and a role filter offering All Roles, Admin and Member sit above it.
Last Active is the quietly useful column. Combined with the Insights blockage list, it tells you whether a document is stuck because someone is overloaded or because they haven't logged in for a month.
There are two roles:
Each row has two icons at the end: a pencil (Edit role) and a bin (Remove user). Your own row has neither, so you cannot accidentally demote or remove yourself.
Selecting the pencil opens an Edit role dialog reading "Update the role for [name]" with a dropdown offering Member and Admin, plus Cancel and Save. Save stays inactive until you actually change the selection.
Inviting a user
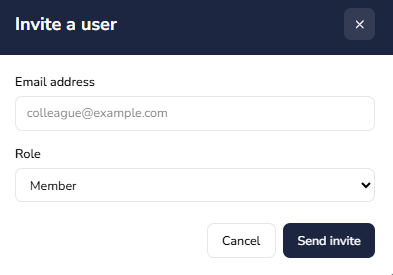
+ Invite User at the top right of the section starts the invitation.
Removing a user
The bin icon removes a user's access.
Before removing anyone, check the Insights blockage list for items assigned to them and reassign those first. Otherwise you risk leaving reviews and approvals sitting with an account that no longer exists. What happens to a departed user's in-flight work has not been tested, so confirm that behaviour before writing removal guidance into your internal process.
Permissions
The final section, subtitled "Control which members can review and approve documents", is the most important control on the page.
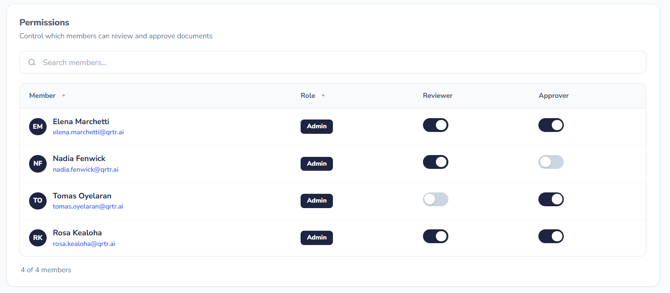
It shows a Search members… box and a table of every member with Member (name and email), Role, and two toggles: Reviewer and Approver.
These two toggles determine who appears in the reviewer and approver pickers elsewhere in Qrtr. When an author sends a document for review or approval from the Word add-in, they choose from the people designated here. If someone isn't showing up as a selectable reviewer, this is where to look.
Note that Role and these permissions are independent. Being an Admin does not automatically make someone a reviewer or approver, and a Member can hold both permissions. Role governs access to administration; these toggles govern participation in the quality workflow.
A few things worth thinking about when setting these. Granting Approver to almost everyone tends to hollow out the approval step, since approval is the gate that stops provisional results being released. Granting it to only one person creates exactly the bottleneck the Insights page will later complain about — the sensible target is enough approvers for cover during absence, but not so many that sign-off becomes a formality. It's also worth reviewing these toggles when people change roles, because permissions granted for a past project tend to persist unnoticed.
A suggested admin routine
When you're setting up a new organisation on Qrtr, build your quality profile templates first so projects have something correct to start from, and lock them once agreed. Invite your users and set roles, keeping Admin to the few people who genuinely need to change organisation-wide settings. Then set the Reviewer and Approver toggles deliberately rather than switching everything on, and check the visibility on each template before anyone adds client material to it.
Thereafter, a quarterly pass over Users & Access and Permissions is worth the ten minutes — checking Last Active for dormant accounts, and confirming the reviewer and approver lists still match who actually does that work.